
Frequently asked questions and answers:
Q: Do you ship internationally? A: Yes. Just add items to the cart and enter your country/address. shipping charges will automatically calculate. if for any reason shipping does not calculate correct, please email and I will do my best to get you an accurate quote.
Q: How long will it take to get my part? A: Some more popular parts we have in stock and on the shelf, requiring only processing, packaging and shipping time (up to one week). We ship everything USPS priority, arriving to most of the US in two days, the east coast in three. If we do not have your part in stock, it will need to be made. From a flat sheet of aluminum, cut, shaped, fit and detailed...all by hand. This takes time. We try to "batch" orders together for efficiency and uniform quality control, so it may take up to 4 weeks before an adequate sized batch is ready to produce. If we foresee any production problems or delay beyond that, we will contact you directly within one week of receiving your order. Please email us if you are on a deadline or request for an expedited order. (Sales@kooglewerks.com)
Q: What is your return policy? A: we accept returns on unused, unmodified parts (must include all hardware and packaging materials) with a 20% restocking fee and will determine shipping/return shipping charges or refunds, depending on situation.
Q: I've got a (insert obscure vehicle here) and would like you to make a (wing/lip/trim/thing) A: Unless you are requesting a part that we already have plans to make, for a particular vehicle I already have access to, chances are you are in the 'special project' realm. some requests we can do, like "add brake duct holes" or "make it longer/shorter"...some projects require far more time and development. To accurately make a well designed and well fitting part, we need a prototyping model. (a clean, unmodified example that has not had extensive prior bodywork/repairs) It does not need to be YOUR car, but it does need to be the same year/model, delivered to us (in Santa Rosa Ca. , one hour drive north of SF) for a duration of a week or more, depending on scope of project. Expect a special project part to cost considerably more than one of our 'Production' parts.
Q: Can I order part #xyz, but a little different (holes drilled, wider/ more/less angle, etc)? A: We try to design stuff for the majority of users, and offer some long/short versions of some parts. I am always up for requests, within reason and/or budget. Some parts cannot be custom made or modified without a car to fit them to. Expect additional cost at a real-time labor rate. Email us directly: sales@kooglewerks.com
BMW 2002 Specific:
Q: I'm not sure which air dam to order, Long or Short? High or Low? A: Much of the long vs. short debate is won by personal preference and "look" you are going for..(some have said the high mount only looks good on cars with no front bumper, etc.) Personally, I think anyone who is going to street drive an '02 with one of my air dam/chin spoilers is SAFEST with the shorter version...(with lowered suspension, you'll still want to avoid those nasty "parking blocks"....but the lip will still be higher than the lowest part of the frame.) that said, I also really like the lower mounted option (for both long and short) due to how well it flows with the factory lines and just looks like an extension of the valence. I would note that if your car has suffered any prior damage (or even "repair" to the lower valence flange) it may make a flange-mounted install difficult....but with the lower mounting, you can install anywhere below the "bump" bead detail in the valence. You'll still be able to get a good looking installation even if the flange is bent or rusty/missing, simply space in up from the flange. (the hardware will not be as accessible from the back, as it moves up behind the nose panel) You may have seen some modified cars out there with these air dams nearly scraping the ground, leading you to believe you need a high mounted short version just to make it in your driveway! this is NOT true. these cars are on air suspension or coilovers adjusted beyond functional ride height. there are a couple full blown SVRA race cars running Low/Long air dams on track with no ground clearance problems.
Please feel free it Email me at forrest@kooglewerks.com if your question has not been answered here!
Next, read up on new products, services and installation tips:
Aluminum aero part installation:

Getting started:
Proper alignment, adjustment & bolt spacing are critical to a clean and solid installation. I suggest starting any test fit or 'mock up' installation by protecting your paint. Masking tape is cheap, paint repair is not. Use a wide roll and cover every surface that might come in contact with your new part, until the final install. Here is my install tool list, you don't need all of these, but this is what I have found to work well for me:
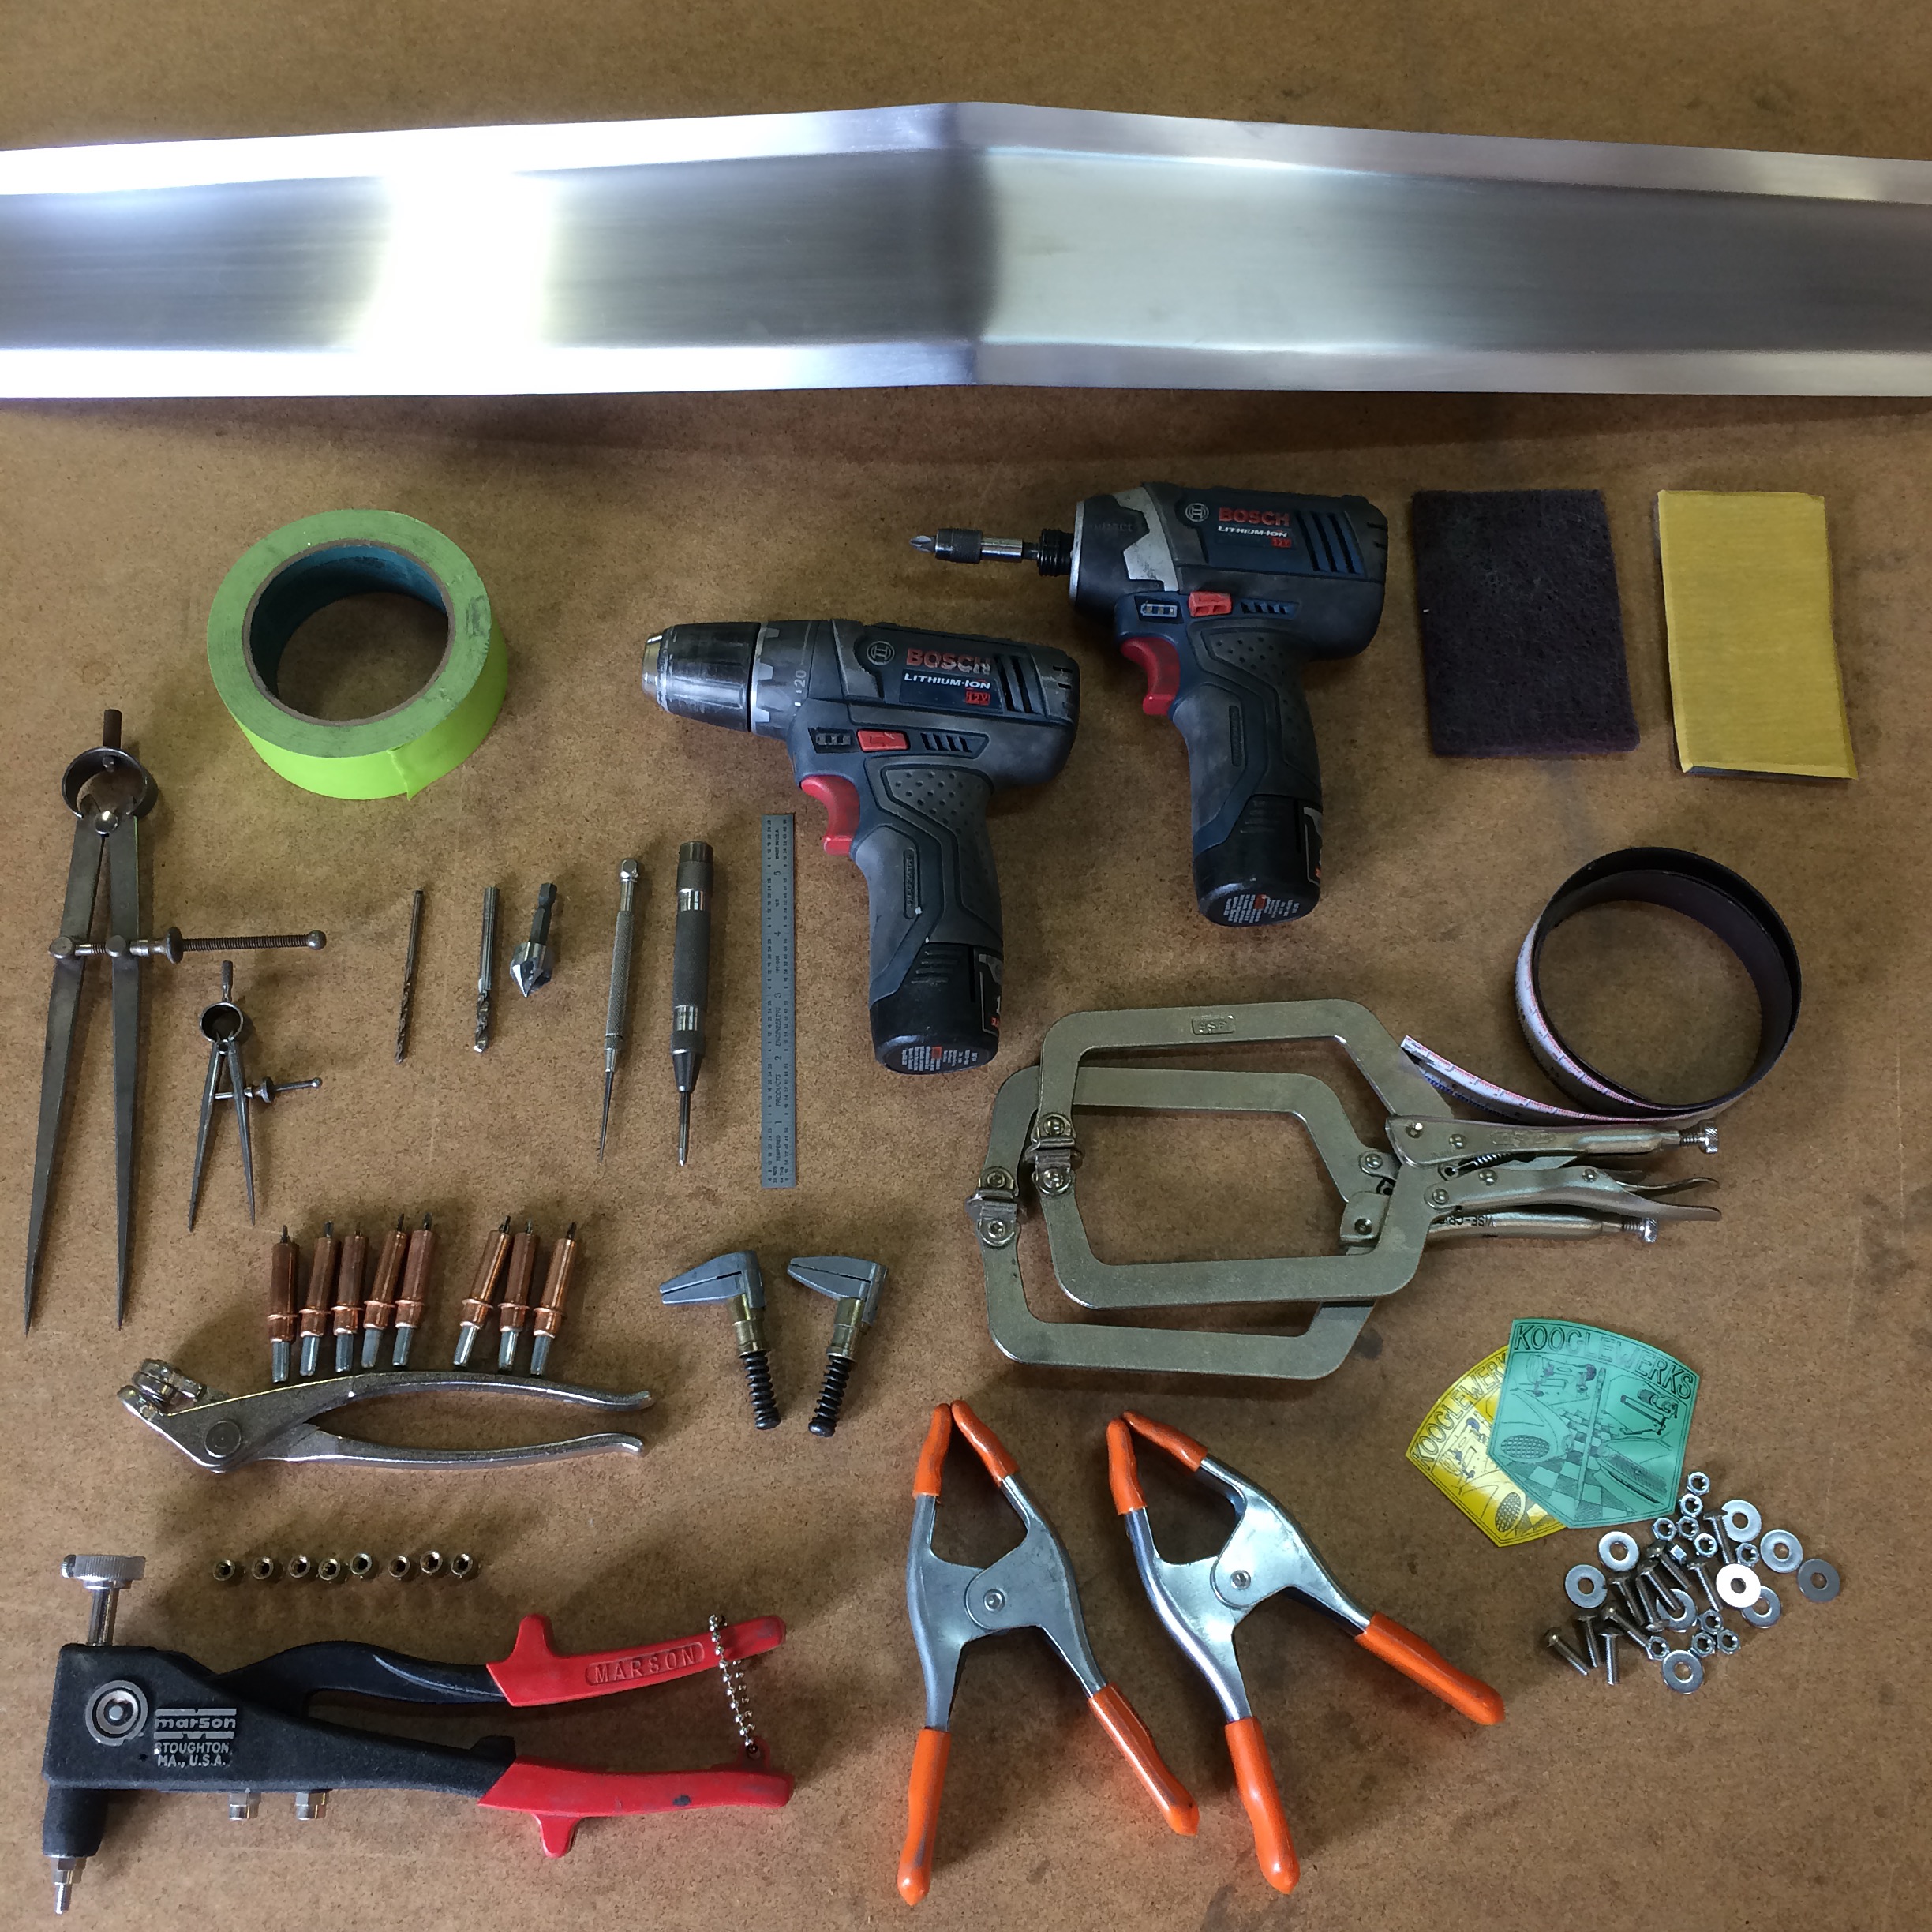
Tools for mock-up and installation:
'Marson' nutsert tool with metric mandrels, 'Pony' spring clamps, 'Cleco' tool and 1/8" cleco fasteners, cleco longjaw side clamps, 'vice grip' 9SP (or even better 'grip-on' brand) locking pliers, 'Starret' dividers, USA made 1/8" pilot drill bit & other needed bit sizes (sometimes an 'irwin' step-bit), 90 degree countersink bit, 'Starret' carbide scribe, sprung centerpunch & machinist rule, small cordless drill and driver, flexible ruler & 240 grit sand paper on foam block and red scotchbrite pad. (* not shown, #2 pencil & fine tip sharpie marker)

Installing aluminum sheet metal parts:
Now that you're all masked off and set up, hold the part up to the mounting surface, (sometimes having a helper to get the side-to-side adjustment dialed in is nice), get the center lined up and split the difference if there is any major variation side to side. You may want to measure a couple common points of reference and make some marks with a pencil to set adjustment parameters.
Now using the spring clamps, (or side cleco clamps, or vice grips with some padding, or a combo of all three), temp clamp the mounting flange in place. (Make sure not to damage/scratch the aluminum doing so). Stand back and check level visually. Re-check your reference marks and note any adjustments to mounting flange or vehicle sheet metal needed.
Make adjustments (see "flange adjustment" article) and re-fit. Now plan your hole layout, (some parts come with no holes) using the masking tape above the mounting flange, you can measure and divide (the compass tool) to evenly space the holes. I typically do eight fasteners for most front air dams. One on the end of the flange, about 1/2" in, and then six more spaced evenly (they end up about 7" apart) rarely do I use an uneven number of fasteners with one in the center....but for some applications this works.
Then with the divider again, using the edge of the flange, you can find center (where you want to drill) and mark that. center punch the marks and drill with the 1/8" bit, then install a cleco fastener (one at a time, making sure the hole alignment does not change as you drill and install the clecos). You can now remove the clamps.
Again one at a time: remove a cleco, drill out to a larger size for the bolt, install bolt. (or remove and drill out larger for nutsert installation). De-burr edge of hole with countersink bit or step bit. install hardware and snug up progressively, then final tighten.
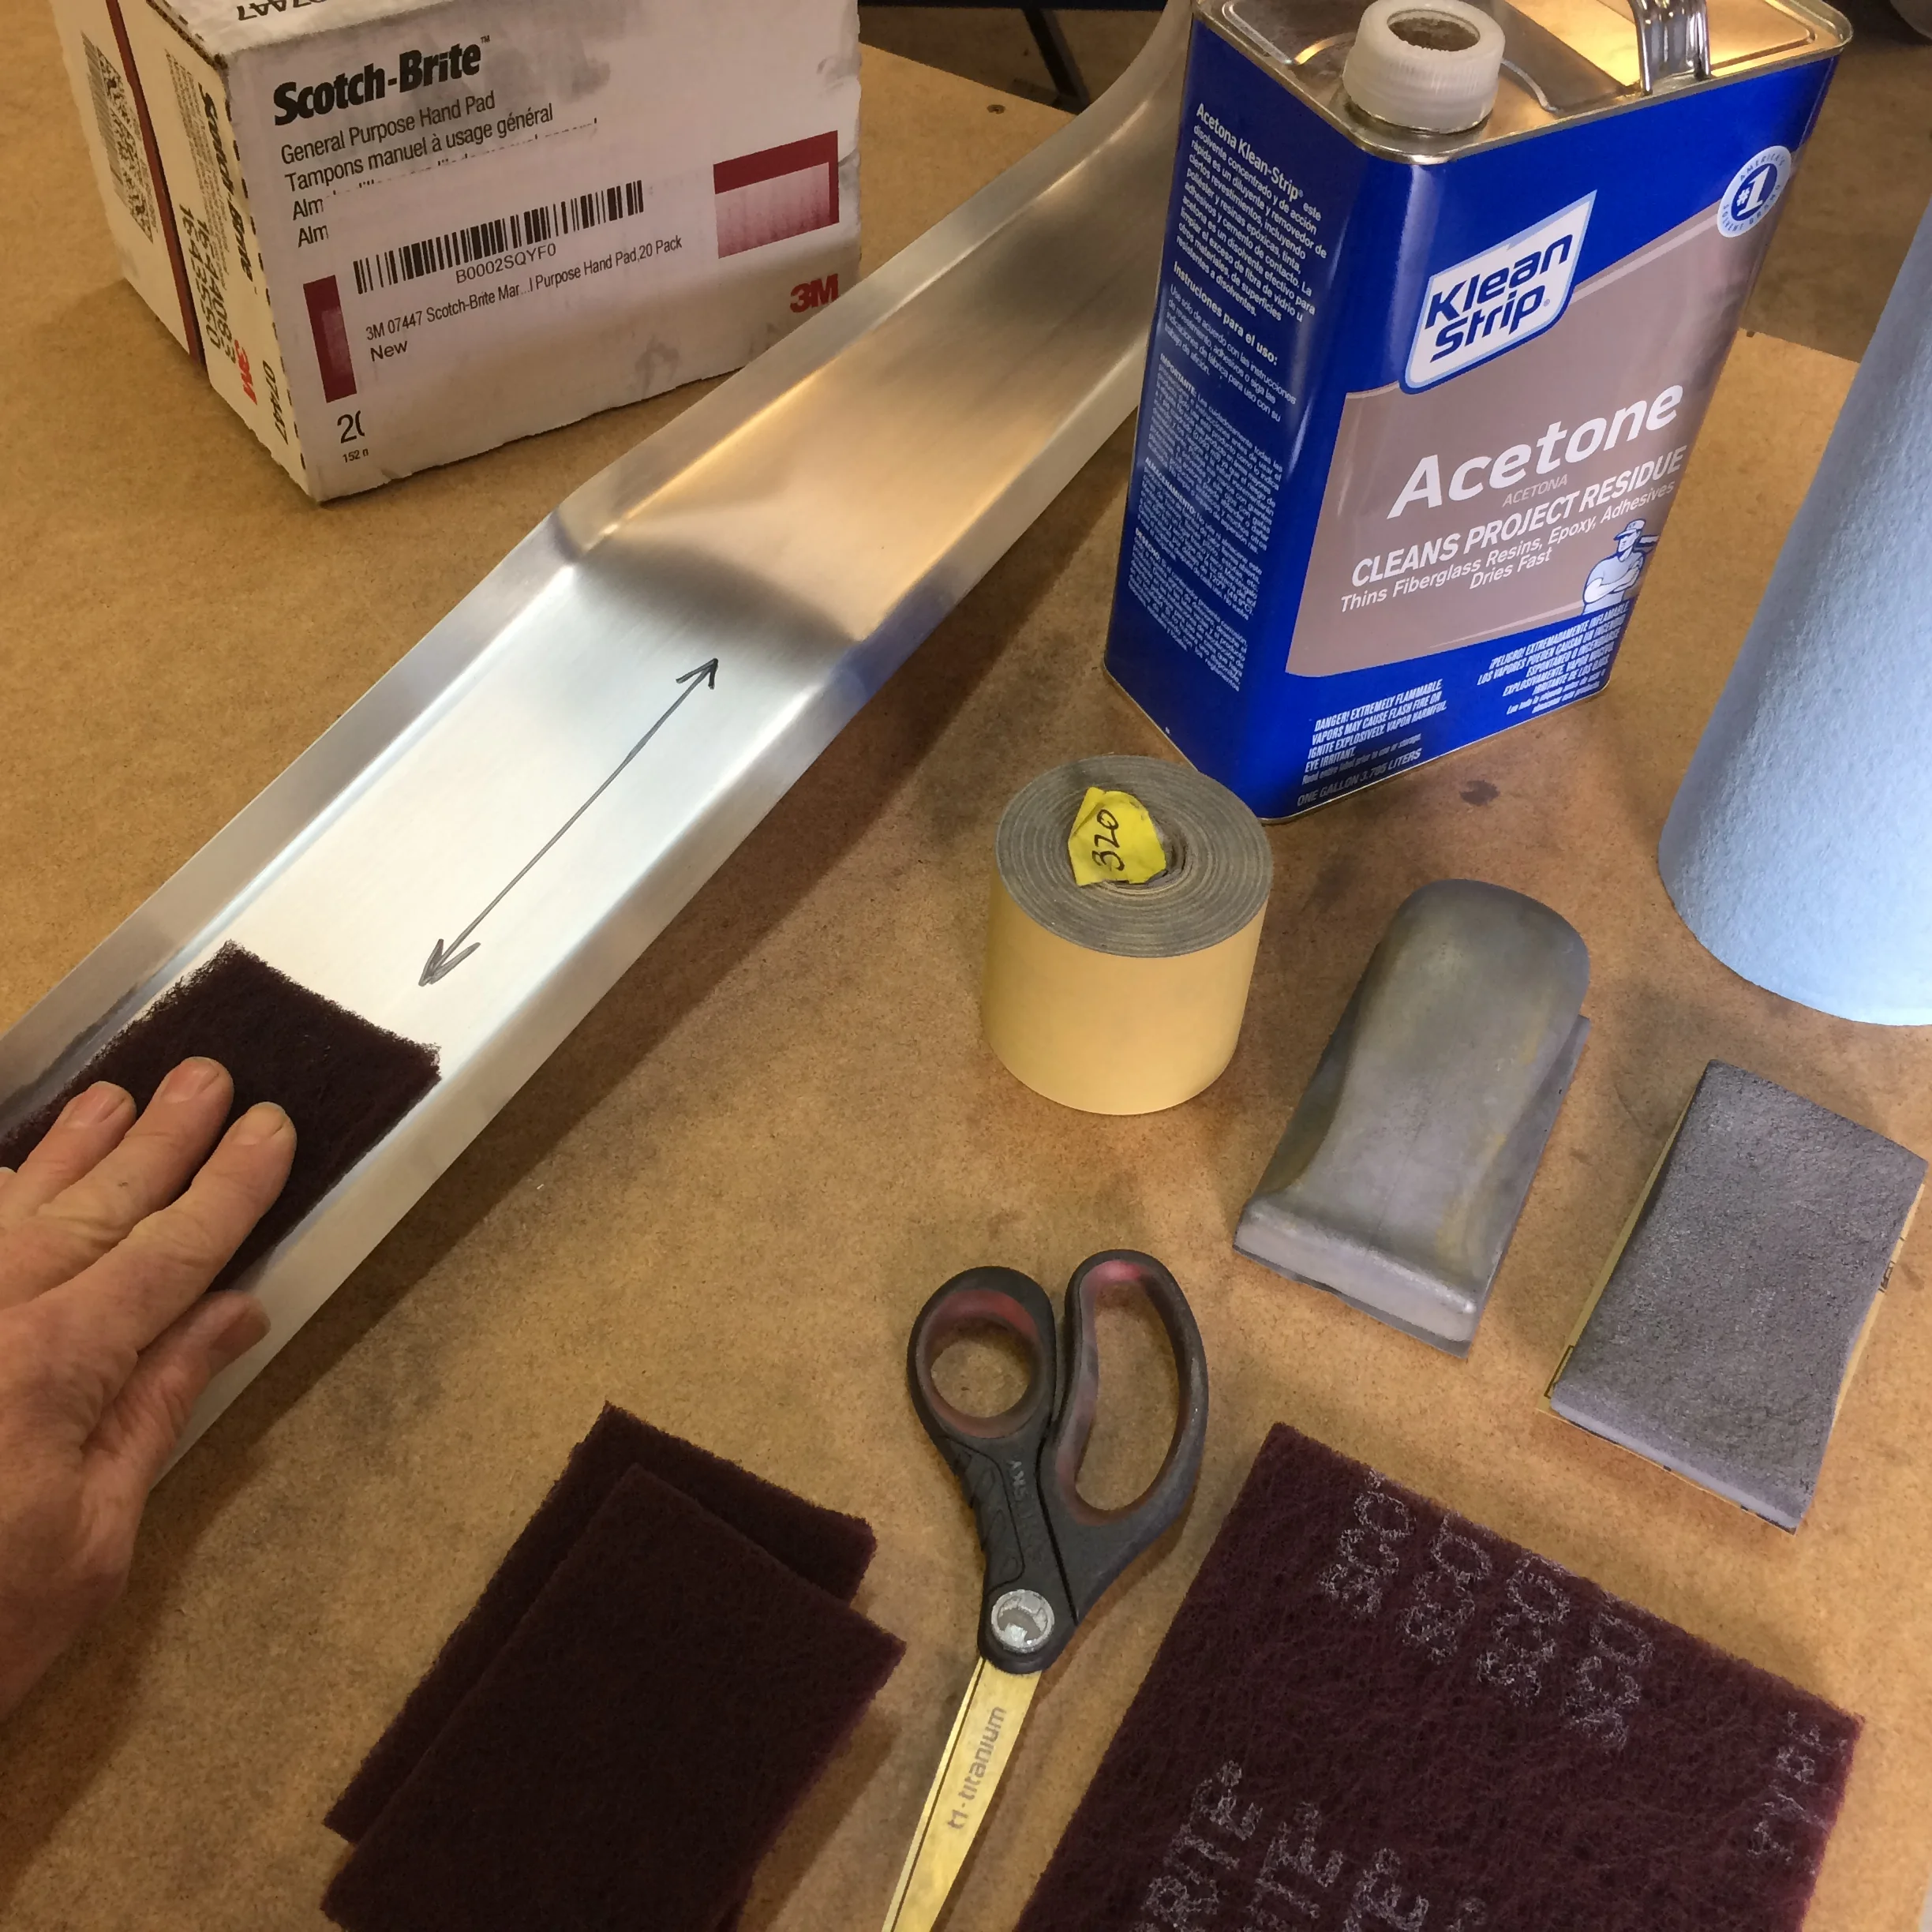
Paint prep and 'raw aluminum' care and repair:
Whether you are preparing your aluminum part for paint, or simply removing small scratches and giving it a cosmetic tune, here are a few products and procedures: 180 grit on foam pad (for sanding out scratches) 240 grit on foam pad (for removing the sanding marks) and 'fine' red scotchbrite pads, for graining and finishing.
If there are deeper scratches or even gouges, you can start with a coarse grit and topically blend out damage. Just remember to sand progressively. 80, 100, 150, 240 (or some variation of these grits) if you still see sanding scratches, go back a couple grits rather than spend an hour with 320. The last step, is to "grain" the part as the photograph illustrates, with long linear strokes from one side all the way to the other.
Wipe clean with acetone or lacquer thinner & apply a light coat of self etch primer before a top coat. (or just wd40, paste wax, etc. if you are leaving the part Raw)
-Forrest